Why did the database administrator leave his wife?
She had one-to-many relationships.
—unknown author
One-to-many relationships
In the next chapter, we introduce SQL queries that span multiple tables
using JOINS. To practice, you will need a schema that
consists of multiple tables. This chapter introduces you to a
small schema with a one-to-many relationship between two tables. In one of
the following lessons on modeling the theory
behind this practical chapter is fully detailed. Here you will only find a
brief introduction.
Two tables
In the previous chapters, the various components of a SELECT statement
were worked out. As a basis, we used a table that was the translation of this
conceptual model:

Separate tables
This schema has one entity type with a number of attributes. One of those attributes is the lecturer code of the coordinator of the course. After all, each course has a unique coordinator. It makes sense to add a second entity type ‘Lecturer’ to the schema. After all, we have a lot of information about lecturers. This entity type contains information about all lecturers, not just the coordinators of an course. A naive attempt is the following figure:

If you translate this to PostgreSQL you get two separate tables. However, this structure is a source of problems. We mention two possible errors:
- Someone adds a row (= a new course) to the table ‘Course’ with a coordinator that is not in the table ‘Lecturer’.
- Someone deletes a row in the ‘Lecturer’ table. The lecturer from this row however, is also coordinator of an course.
Both operations will cause the database to contain errors. You can then no longer look up info from some courses about the coordinator of the course. This is not a good solution. You want your RDBMS (‘Relational DataBase Management System’) to protect you against operations that introduce errors into the schema.
Linked tables
The problem, of course, is that the two tables cannot exist separately. There is a relationship between the two. The conceptual model in the figure below makes this relationship visible:

From right to left you read the relationship as ‘is coordinator of’, from left to right it could then become something in the style of ‘has as coordinator’. Each course has at least one and at most one (i.e. just one) coordinator. Not every lecturer is coordinator of an course, but a lecturer could possibly be coordinator of several courses. The cardinality on lecturer's side is thus (0, N). This is an example of a one-to-many relationship.
Note that the attribute ‘Coordinator’ from an earlier figure is omitted. Indeed, it has been replaced by a relationship with a new entity type ‘Lecturer’ because we feel the need to do more than just keep track of a lecturer's number.
Translation to relational model
Now how do you translate this one-to-many relationship into a relational model? After all, PostgreSQL is an example of a relational database. If we translate the conceptual model from the previous section to a logical model, that logical model will have to be a relational model.
You can study all about logical models in detail in the chapter
‘Logical data model’. The sole purpose of
this section is to briefly introduce you to this topic so that we can move
on to the next part in our exploration of the SQL language (JOIN). The logical model looks like this :

For now, it's enough that you can read this diagram, and it's not that difficult:
- Each entity type becomes a table, represented by a rectangle with a title: ‘Course’ and ‘Lecturer’.
- Each attribute of an entity type becomes a column in the table.
- Each table has a primary key (PK), represented here in yellow. That primary key has a unique value for each row in the table.
- Each course unit is required to have one coordinator. There is therefore a relationship between the two tables. In the table ‘Course’ a ‘Coordinator’ column has been added. This column is a so-called ‘Foreign Key’ (FK, indicated in green) because each value of this column must occur as a PK of the ‘Lecturer’ table.
- The connection between the two tables makes it clear that the contents of the column corresponds to the value of the ‘Lecturer_id' column. The symbol (two dashes) in the small blue circle indicates that each course unit is required to have one lecturer as coordinator.
- Conversely, the symbol in the larger orange circle shows that each lecturer can be coordinator of zero (bullet) or one or more courses (crow's foot).
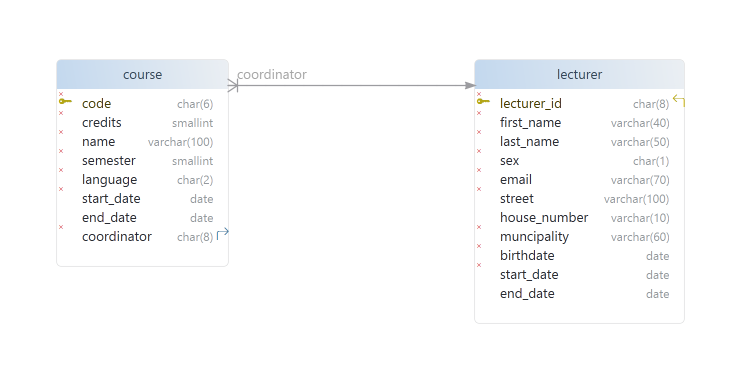
This logical model is finally converted to a physical model, where we specify further information that depends on the specific properties of the chosen RDBMS (in our case PostgreSQL). For example, an example would be the data types of the columns.
The physical model was drawn with DBSchema. We will cover this in detail later. This physical model corresponds to the logical model, in a slightly
different notation (notice the blue departing arrow indicating that this field is an FK referring to the
yellow-brown arriving arrow
at lecturer_id). Also, each field has been given a data type (char, date, ...):
Adding this one-to-many relationship in the database is done as follows:
- First create the table ‘Lecturer’.
-
Search for the primary key of the ‘Lecturer’ table. This primary key is
the ‘lecturer_id’ field. The data type of this primary key is a
char(8), because a lecturer code always begins with a ‘u’ followed by seven digits. Note that we are actually using the designations ‘field’ and ‘column’ interchangeably. -
In the table ‘Course’ a column should now be created with exactly the
same data type as the data type of the primary key in the lecturer
table, so also a
char(8). We call this ‘transferring the primary key’ and refer to it in the course table as an ‘foreign key’. -
Now link these two columns using a constraint (
constraint). - Then first enter the data in table ‘Lecturer’.
- After that you can fill the table ‘Course’ with rows.
Realization in your own schema
From here, you need to roll up your sleeves and effectively create the two tables . After all, we want you to soon be able to add and remove information in your own tables and that won't be possible if we let everyone work in the same table. So start pgAdmin and execute the following steps.
If you follow the roadmap below (based on the steps in previous section)
you get two linked tables filled with data. We'll make some small
exercises on this schema. In the next chapter on JOIN we will
use this schema as a basis.
- The following steps assume that everyone has their own schema with the name ‘rxxxxxxx’, using of course your own r-number. The easiest way is for you to use the pooling connection at port 62526.
-
Check your schema to see if there may already be a table ‘Course’ or
‘Lecturer’ present. If so, remove this table with a
DROP TABLE ...in a query tool. Remember: either use for each table name first the name of the schema, followed by a period and then the table name, or you define yoursearch_pathproperly. - Download the file ‘lecturer-course-SQL.txt’. The next steps use pieces of this SQL code to build everything and populate it with data. Each time, you can copy a piece from this text document, paste it into your query tool and execute.
-
Create the table ‘Lecturer’ by executing the
CREATEcode for this table from the file you just downloaded. Nothing new to see here: two fields not required, some different data types, a primary key, ... -
Now create the table ‘Course’ by copy/paste from the txt file. This
code needs a little bit of explanation:
CREATE TABLE rxxxxxxx.course (
  code char(6) NOT NULL ,

  ...

  coordinator char(8) NOT NULL ,
  CONSTRAINT pk_course_code PRIMARY KEY ( code ),
  CONSTRAINT fk_course_lecturer FOREIGN KEY ( coordinator )
    REFERENCES rxxxxxxx.lecturer( lecturer_id )
);
This last
CONSTRAINTis new. Loosely translated, this constraint says the following: “the ‘coordinator’ column of this table refers to the primary key ‘lecturer_id’ of the table ‘Lecturer’ and is therefore a foreign key”. It is a good idea to use for eachCONSTRAINTa sensible name. In this case: ‘fk’ (for ‘foreign key’) followed by the two names of the two tables involved. The tool DBSchema that we will use later for this, uses this naming scheme automatically. -
Think logically about the correct order of filling in the data in the two tables. The ‘Course’ table depends on the ‘Lecturer’ table. You can only
add a coordinator for a course if this person already exists in the
‘Lecturer’ table. So first fill the lecturer table by a copy/paste
operation of the
INSERTstatements from the txt file.INSERT INTO rxxxxxxx.lecturer( lecturer_id, last_name, first_name, email, street, house_number, municipality, birthdate, start_date, end_date, sex ) VALUES ( 'u0042352', 'Adriaens', 'Gerben', 'gerben.adriaens@ucll.be', 'Ankerstraat', '12', '1330 Rixensart', '1984-02-16', '2017-09-01', null, 'M'); INSERT INTO rxxxxxxx.lecturer( lecturer_id, last_name, first_name, email, street, house_number, municipality, birthdate, start_date, end_date, sex ) VALUES ( 'u0057764', 'Bogers', 'Goedele', 'goedele.bogers@ucll.be', 'Elzasgang', null, '2830 Willebroek', '1979-09-09', '2006-11-20', null, 'F'); INSERT INTO ... -
Finally, now that the ‘Lecturer’ table is populated, you can also
populate the ‘Course’ table with data. This time we'll do it with a
CSV list. Copy these lines from the list and put them in a new .csv
file. Import this .csv file like (see section ‘CSV file’):
code,credits,name,start_date,end_date,language,semester,coordinator MBI71A,3,Probleemoplossend denken,2016-09-15,2022-09-14,nl,1,u0012047 MBI65X,4,Webontwikkeling 1,2017-09-15,2022-09-14,nl,1,u0012047 MBI66X,4,Webontwikkeling 2,2017-09-15,2022-09-14,nl,2,u0015529 MBI20X,3,MobieleToepassingen,2018-09-15,2023-09-14,nl,5,u0057764 MBI26A,6,Computersystemen,2013-09-15,2022-09-14,nl,6,u0041234 ... -
Done! Run a
SELECT * FROM ...on both tables to view the data.
Response of the RDBMS to errors
Now make the following small exercises. Sometimes the purpose of an exercise is to let you make an error so that you learn to properly interpret error messages from our RDBMS.
Add a new lecturer: ‘Anouk De Ridder’ with u-number ‘u0012047’. She
lives at ‘Kerkstraat 23, 3053 Haasrode’, was born on 5 May 1994 and
joins UCLL today. Mail addresses at UCLL are simple:
firstname.lastname@ucll.be. Explain what happens when you run an INSERT with the data above.
You get an error message that a lecturer with this lecturer code
already exists. Since the lecturer code is the primary key (and
therefore
unique) the RDBMS returns an error message and the INSERT is
not executed. Again, you'll notice that it's useful to use a
meaningful name for your CONSTRAINT: something is wrong
with primary key ‘lecturer_id’ in the table ‘Lecturer’:
ERROR: duplicate key value violates unique constraint "pk_lecturer_lecturer_id"
DETAIL: Key (lecturer_id)="(u0012047)" already exists.
SQL state: 23505
Stupid typo of course above. The u-number of Anouk is not ‘u0012047’ but rather ‘u0099999’. Now add this lecturer to the table ‘Lecturer’.
No problem this time if your query was something in this style:
INSERT INTO rxxxxxxx.lecturer( lecturer_id, last_name, first_name, email, street, house_number,
  municipality, birthdate, start_date, end_date, sex ) VALUES ( 'u0099999', 'De Ridder',
  'Anouk', 'anouk.deridder@ucll.be', 'Kerkstraat', '23', '3053 Haasrode',
  '1994-07-05', '2022-10-15', null, 'F');
The server replies that one row was successfully added:
INSERT 0 1

Query returned successfully in 85 msec.
The same day she is added to the database, Anouk De Ridder decides that she does not want to become a lecturer after all. Remove her from the table ‘Lecturer’.
DELETE
FROM rxxxxxxx.lecturer
WHERE lecturer_id = 'u0099999';
You can also use the following code, but then you delete everyone with this name. Who knows, maybe there is more than one person with the name ‘Anouk De Ridder’ and then these persons will also be removed from the table:
DELETE
FROM rxxxxxxx.lecturer
WHERE last_name = 'De Ridder' AND first_name = 'Anouk'; -- dangerous!
The server replies that one row was successfully deleted:
DELETE 1

Query returned successfully in 53 msec
Remove ‘Bram De Smet’ of Leuven from the ‘Lecturer’ table. Explain what happens.
With this code you delete the row:
DELETE
FROM rxxxxxxx.lecturer
WHERE first_name = 'Bram' AND last_name = 'De Smet' AND municipality LIKE '%Leuven';
However, the server gives this error message:
ERROR: update or delete on table "lecturer" violates foreign key constraint
  "fk_course_lecturer" on table "course"
DETAIL: Key (lecturer_id)=(u0012047) is still referenced from table "course".
SQL state: 23503
You read this error message as follows: “The table ‘Course’ contains at least one row that refers to this lecturer. This lecturer is therefore coordinator of a course. Therefore, it should not be removed.”. In the case of Anouk De Ridder, there was no problem because her u-number does not appear anywhere in the course table and so she could safely be removed from that table.
Finally, add a new course: ‘Trees and graphs’ with code ‘MBI39A’. This
course was given in the second semester, stopped this year and ran from
September 15, 2017 to September 14, 2022. The course was given in Dutch
and had 3 credits. Coordinator of the course was the lecturer with u
number ‘u0099998’. Write the INSERT, execute and interpret
the result.
With this code, you do the INSERT:
INSERT INTO rxxxxxxx.course( code, credits, name, start_date,
  end_date, language, semester, coordinator ) VALUES ( 'MBI39A', 3, 'Trees and graphs',
  '2017-09-15', '2022-09-14', 'nl', 2, 'u0099998');
The database server refuses to execute this INSERT and returns
the following error message:
ERROR: insert or update on table "course" violates
  foreign key constraint "fk_course_lecturer"
DETAIL: Key (coordinator)=(u0099998) is not present in table "lecturer".
SQL state: 23503
Since no lecturer with this lecturer code is already present in the ‘Lecturer’ table, you cannot add a new course with this lecturer as coordinator. Only after you have added this lecturer in the ‘Lecturer’ table, can you add the course.