The best teachers do not simply spout information at their students and hope for the best. The best teachers are those who set expectations responsibly and ensure that students adopt a resilient, ‘can-do’ frame of mind.
— Walter Shields, SQL QuickStart Guide: The Simplified Beginner's Guide to Managing, Analyzing, and Manipulating Data With SQL
Intro SQL
In this chapter, you dive into a database for the first time. You will learn the basic structure of a relational database and how to structure and manipulate content. Everything we see in this chapter will be further explored and explained in future chapters. It is explicitly intended that you execute the instructions given in this chapter on the database server.
If you have any questions, we're here to help.
Our first table: list of courses
Our Applied Computer Science program consists of a long list of courses. Some are compulsory, others are optional courses. Your ISP (Individual StudyProgram) will make a selection from this list. However, the program changes regularly. The list of all courses should also include those courses that used to be in the program but are no longer organized. Thus we need an overview of both the current courses and an archive of all previous ones in one single table in our database.
In this example, we simplify reality quite a bit so that we cover all the steps without making it too complex.
What do you want to track?
Before you start coding, you need to reflect on a few things. What exactly do I want to track? What should the data be used for?
Take a look at the educational offerings of Applied Computer Science. Here you will find all the courses of our bachelor program of the academic year 2023-2024.
Look at one of the courses, e.g. ‘Front-End Development’:

What information do you find here? Obviously, in this introductory example we very much limit ourselves to the basics.
We mainly want to store the info that is useful for putting together your ISP. We choose the following data:
-
Each course is uniquely identified by a course code. For ‘Front-End Development’, that code is ‘MBI01J’. If you look at other courses you will notice that this code always consists of 6 characters.
-
Needless to say, it is rather impractical to use the code each time we're discussing a specific course. Therefore, we also provide each course with a name such as ‘Front-End Development’.
-
Important for establishing ISPs is the number of ECTS credits per course. Most courses have 6 credits.
-
In 2023 we started providing courses in English. The same course is now taught in both Dutch and English. Those two versions will each have a different course code, but it is still useful to include the language in our list.
-
In which semester is the course given? Some courses (such as internship) may be included in different semesters. For your ISP it is also useful if you can get an overview by semester. Let's use this value as a combination of phase (1, 2 or 3) and semester (1 or 2). For example, the value 4 means this is an course from phase 2, semester 2.
-
Courses come and go. A couple of years ago, the applied computer science program (in Dutch) looked completely different. For example, there was a course ‘Probleemoplossend denken’ (‘Problem solving thinking’) which was given for about five years and has now disappeared from the program. We will have to come up with a way to include this information in our list so that we can reconstruct an overview which courses were given in a specific year.
-
Each course has a coordinator and lecturers who teach it. Courses are usually taught by several lecturers (in the first year often 5 per course). We will add that later to our model as it is currently a bit too difficult as it requires a separate table (more on that later). At this point we can already add the coordinator, because each course has precisely 1 coordinator which is also a lecturer. Like students, lecturers have a unique code of 1 letter (‘u’) followed by 7 digits. Later we will expand on the lecturer and keep more information (name, email address etc.). At this point the lecturer code is sufficient.
The data from the list above will become the columns (vertically) of the table. Per course, there will then be one row (horizontal) in the table.
Some simple data types
A database such as PostgreSQL uses several data types. Before we can get started with SQL, we first need to tell you something about data types. Each data type has its specific purpose and properties. It is important to reflect carefully about the most fitting data type. In this introduction, we will limit ourselves to a small selection.
char()
Sometimes you know in advance that the value of a particular attribute
(column) is a text value. We use the term ‘alphanumeric values’:
letters and numbers, interpreted as characters. If that text value
always has the same number of characters, then the data type char is the most suitable in this case.
A course code always consists of six characters (for BCS: ‘MBI’ followed by
two digits and finally a letter). So it is best to use
char(6) as the data type.
Similarly, each lecturer is uniquely identified with a code consisting
consisting of a ‘u’ followed by seven digits, e.g. ‘u0012047’ (a.k.a. Jan
Van Hee). So for this, char(8) is the obvious data type.
For storing the language of a course, this data type is also suitable.
Indeed, any language can be represented via ISO 639-1 codes (https://en.wikipedia.org/wiki/List_of_ISO_639-1_codes). Dutch (‘nl’), English (‘en’), French (‘fr’), ... and so a char(2) is a good choice.
varchar()
For some columns you know that they contain text values, but you
don't know in advance how long the text value will be. You could still
use char, but that has the disadvantage of always reserving
the full memory space. Let's suppose you use the data type char(100) for the name of a course, in order to allow new courses with a very long
name or description to be added. A course like ‘Database foundations’ only
uses 20 of the reserved 100 bytes, meaning 80 bytes would be filled up with
blank spaces. That's an inefficient usage of available memory.
For this kind of data, it's best to use varchar(100). The
total memory space a text value occupies equals the number of characters plus 1 or 2 bytes for length information. In this case, ‘Database foundations’ would therefore take up 21 bytes
(length = 20 + 1 extra byte) memory space. This gives a more efficient
usage of available memory compared to the 100 bytes.
But every advantage has its disadvantage: varchar is more memory
efficient, but is slower to process (save, retrieve, ...) than
char. Moreover, char is more suitable for data that
changes frequently. For the small tables we will create in this course of course,
speed has little importance. But it is indeed an important trade-off that has
to be made in large databases.
integer
For integers, the data type is integer (4 bytes, from - 2147483648
to 2147483647). That is, of course, a bit overkill for the ‘credits’ column.
PostgreSQL also has smallint which takes only 2 bytes. That's
actually the better choice here, so let's go with this option.
date
Working with dates is an important part of database manipulation. In this introductory example, we need to be able to indicate when a course started and up to which date it was a part of the program. There are many different ways to format a date, but we'll keep it simple here. If the course ‘web development 1’ started on 16 September 2015, then we can enter that enter the date in ISO 8601 format as ‘2015-09-16’.
Create schema
A database server such as PostgreSQL can hold a lot of databases. Each database may consist of several schemas . For this assignment we first create a new schema.
Execute the following steps in pgAdmin.
Open the pooling_62526 connection.
-
Open the database corresponding to your class (e.g. 1CS1 if you are in class 1).
-
Right-click on ‘Schemas’ and choose ‘Query Tool’. In this window, you can you can now execute SQL code (so-called ‘statements’ or ‘queries’).
-
Create a new schema for this exercise in the database that belongs to your class. The name of the schema is your r-number (where the code shows how I would do it for my account, use your own student number instead of my u-number, of course). Type this code and execute using the triangle symbol ▸ (hotkey: F5, remember this because you will use this command often).
CREATE SCHEMA u0012047; -- use your own rnumber! (comments start with -- in SQL)SQL statements are usually written in capital letters (‘CREATE’), but this is not mandatory. It is best to use no spaces in schema names. It can be done, but then you have to put this name between double quotes ("...") whenever you need it. We prefer not to do this, as it adds more complexity and the possibility to make mistakes. We prefer no capitals or hyphens in schema names, because even then double quotes are mandatory. If there are no errors, the database server answers something along these lines:
CREATE SCHEMA Query returned successfully in 293 msec. -
You should now refresh the schema list. Right-click on Schemas and choose ‘Refresh...’. Your new schema is now shown in the list. Great, well done!
The video below illustrates the creation of a schema and the table herein.
Create a table in this schema
A database schema usually consists of many tables that are interconnected by so-called keys. In this introductory example we restrict ourselves to just one table named ‘course’. The table has eight columns.
From here on, it's a good idea to save everything you type in a separate .txt file.At the end of this class, we'll ask you to delete the rows you created and drop the table. As a result, you lose everything you created, so it makes sense to save your work in a text file, e.g. one for each lesson.
Code for CREATE
Type the code in the code block below. We recommend retyping the code, but you can also copy/paste the code from this text. We would advise you to type. There is something like ‘muscle memory’ which you should not underestimate in IT. By typing something, your brain learns new skills in a way that doesn't happen when you copy/paste.
CREATE  TABLE course (
  code            char(6)  NOT NULL ,
  credits         smallint  NOT NULL ,
  name            varchar(100)  NOT NULL ,
  start_date      date  NOT NULL ,
  end_date        date ,
  language        char(2)  NOT NULL ,
  semester        smallint  NOT NULL ,
  coordinator     char(8)  NOT NULL ,
  CONSTRAINT pk_course_code PRIMARY KEY ( code )
);
Some comments on this SQL code:
-
For the name of a table, do you use the singular (‘course’) or plural form (courses)? Opinions are divided. We usually go for the singular form. It doesn't really matter which form you choose, as long as you are consistent.
-
White space, indentation and spaces are not important for the computer but they are important for the people who have to read the code. So please write readable code and use white space.
-
We talked about the datatypes above:
char,varchar,smallint,date. -
Between attributes (columns) comes a comma.
-
The addition
NOT NULLmeans that if you add a new row (new course) to the table, it is mandatory to provide a value for this column. In other words this column should be filled for each row. There is only one field that may be left blank and that is the ‘end_date’ field. This also makes sense: a course such as ‘Database foundations’ (new from academic year 2022-2023) will hopefully run for a number of years anyway. We don't yet know on which date it will no longer be organized. Every ongoing course therefore has an empty value in the ‘end_date’ column. -
The last line adds an important condition (‘CONSTRAINT’), named ‘pk_course_code’: the ‘code’ column is the primary key. That is, this value uniquely identifies each row. If, in the table, you try to add a new row with the same code, the database server gives an error message which in turn preserves the data integrity. We talk about keys in detail in the chapter on the logical data model .
-
Multiple SQL statements are separated by a semicolon (;). Even though
this code contains only one (long) statement, most developers will place
a
;after it by default.
Copy all code until the ;, paste and execute (F5).
If all is well, the database server responds with:
CREATE TABLE
Query returned successfully in 1 secs 151 msec.
The first student in the class to execute this code will indeed get this message. All subsequent students, however, will get an error in this style:
ERROR:  relation "course" already exists
SQL state: 42P07
In the next section, we will examine this common error and provide you with two solutions.
Choosing the right schema
We've deliberately made you make a mistake that everyone has to (and will) make at least once. Every table you create automatically ends up in the schema ‘public’. Check it out ... You will see that the table ‘course’ is there. That's why everyone – except the first student – gets the error message that a table with that name already exists. Everyone is working in the schema ‘public’ and trying to create a table with a name that already exists.
There are two solutions to this problem:
-
Always precede the name of a table by the name of the schema. Specifically, for me (use the name of your own schema, so with your r-number) I have to modify the CREATE statement to:
CREATE  TABLE u0012047.course (
  code          char(6)  NOT NULL ,
  ...
);
This solution is suggested by many people as a best practice and many software tools (like DBSchema, that we will use later) do it systematically this way.
-
An alternative is that you first define
search_path. My code then becomes (don't forget the ; between two SQL statements):SET search_path to u0012047; CREATE TABLE course ( code char(6) NOT NULL , ... );
Now repeat the above CREATE statement from the previous section
to create the table in your own schema.
Add data with INSERT INTO
Our table is ready. The columns are defined. The only thing missing is data (rows). Let's add a course, e.g. the one that you are currently working on: Database Foundations. Look up all the information in the ECTS sheet for this course (you can find it via Toledo or via the educational offer). There are two ways to add the desired info as a row in our schema: with or without mentioning the column name.
Mentioning all columns to give values
Type in and execute the following code (and for the last time: replace
my schema name with the name of your own schema). You can, of course,
also set your search_path properly and then you won't have to
substitute the name of the schema before the table name.
INSERT INTO u0012047.course(code, credits, name, start_date, language, semester,
coordinator) VALUES ('MBI10H', 6, 'Database Foundations', '2022-09-15', 1, 'u0152691');
-- comment: the coordinator is Bram Van Impe, this is his lecturer code
Text and dates are put between single quotes. The credits and semester are an integer, so without quotes.
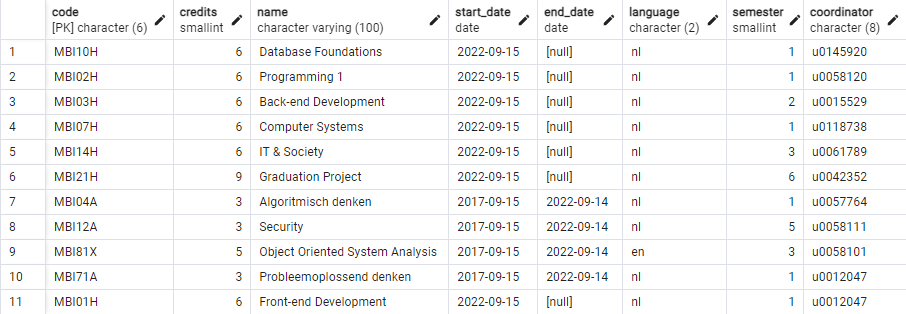
If the server replies with ‘successfully’, you can check the content of
the entire table with the SELECT command (which we will elaborate
on in a later section).):
SELECT * -- the star * means: return the full row
FROM u0012047.course;
The server replies with the following statement:

Note that the ‘end_date’ field has the value NULL. This means
that there is no value for this field.
Null columns
There is a shorter way to add a row, where the value
NULL does matter. As an example, let's add the course ‘Programming
1’. We do that with the following code:
INSERT INTO u0012047.course
VALUES ('MBI02H', 6, 'Programming 1', '2022-09-15', NULL, 'nl', 1, 'u0118171');
-- the coordinator is Karen Baerts u0118171
See what the big difference is? You no longer have to list the column
names, but now you have to explicitly enter the value NULL for
the column ‘end_date’. Check via SELECT * FROM ...
that this course has also been added to your schema.
Assignment
Now add a number (at least 10) of your own courses to your schema. Make sure that you also have at least one course from semesters 2, 3, 4, 5 and 6. Add also preferably a course in an other language (e.g. Français pour le boulot, Visual user environments, ... think of something yourself if necessary). Also add some courses with less than or more than 6 credits. Also add some courses that are no longer taught, you find a list of courses that were taught in 2021-2022 here. The end date for these classes is 2022-09-15.
Important tip: later we will destroy the full table. So keep all the queries you write to add new rows into a .txt file.
As long as you don't close pgAdmin, you'll find all previous queries under the ‘Query History’ tab.
Viewing data with SELECT
You already used SELECT * FROM table name above to get the full contents of your table. I added a total of 11 courses to my table. These
11 rows allow, for the remainder of this text, to try out different SELECT
queries.
You can view this table in the database ‘df’, schema ‘sql_intro_en’.
Each student was given USAGE rights to the schema and SELECT permissions on the table. So you cannot add, update or delete. Therefore,
you work in your own schema and table, where you are not restricted. The
permissions topic is covered in a later chapter.
Sometimes, of course, you don't want to see all the columns of the
table. Suppose you just want a list of all the names of courses, followed by
their number of credits. In the SELECT you then explicitly specify
those columns in the correct order specify.
SELECT name, credits
FROM sql_intro_en.course;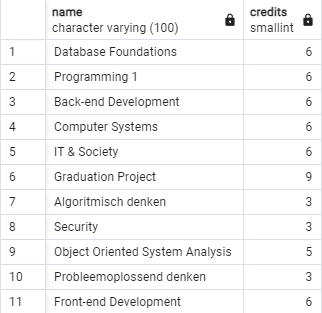
On reflection, I don't think the column header in the above overview is
appropriate. Instead of ‘name’ in the column header, I would rather put
‘name course’. This can be done with the following query, using AS:
SELECT name AS "name course", credits
FROM sql_intro_en.course;Select specific rows with WHERE
The result of SELECT ... FROM ... contains all rows in
the table. Usually you are not interested in all rows, but only
in rows that fulfil one or more conditions. A example: I want an
overview of all courses I am coordinator of or I have been coordinator of
in the past. My staff number is ‘u0012047’. The overview may show all
columns. The query will be:
SELECT *
FROM sql_intro_en.course
WHERE coordinator = 'u0012047';
Two rows are displayed:

WHERE coordinator = ‘U0012047’ would not have returned a single row because all staff numbers were entered
with lower case.
Logical operators
You can combine conditions with so-called ‘logical operators’:
AND, OR and NOT. More details will
follow later, but for now one small example. A compound condition with AND is true only if both conditions are true. Try the following exercise.
List all courses that have less than 6 ECTS credits and are given in Dutch. The list contains only the columns ‘name’, ‘code’ and ‘credits’.
SELECT name, code, credits
FROM sql_intro_en.course
WHERE credits < 6 AND language = 'nl';
Testing for empty fields
If you want to test for the value NULL you cannot use the
equal sign =
but should use IS NULL or IS NOT NULL. Let's do
a little exercise.
List all courses that are no longer organized.
SELECT *
FROM sql_intro_en.course
WHERE end_date IS NOT NULL;
Deleting rows with DELETE
A database server should also be able to delete rows. Perhaps the data is
outdated, no longer applicable or just wrong. Of course, this is an operation you should be careful with. You almost always use the DELETE command in combination with
WHERE to delete only certain rows from the table.
As an example, we remove all courses from the table that have less than 4 credits:
DELETE
FROM u0012047.course
WHERE credits < 4;
The database server replies with the message that three rows have been
deleted from the table. Check with a SELECT *
to see which rows have been removed.
DELETE 3
Query returned successfully in 76 msec.
There is also a TRUNCATE statement that lets you delete the entire contents of a table. The table itself remains, but all rows are deleted.
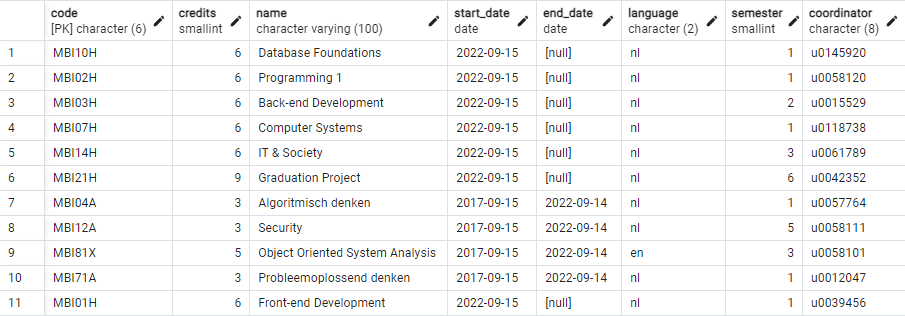
Adjust data with UPDATE
Lecturers get different tasks, courses change names, credits or semester,
... So you also need to be able to modify rows. Due to a change in my
assignment, I am no longer coordinator of the course ‘Front-End
Development’. The new coordinator is Johan, with staff number ‘u0039456’.
We update the data in the table with the somewhat more difficult query UPDATE ... SET ... WHERE ...:
UPDATE u0012047.course
SET coordinator = 'u0039456'
WHERE code = 'MBI01H';
If the condition in the WHERE applies to multiple rows, then the
coordinator of all these rows is modified. In other words, it's a
query you need to be careful with. Since we are doing a test here
on the primary key ‘code’, there is only one row where this test passes and
can therefore be updated.
If your operation was successful, you can view the result with a regular SELECT.
For all ongoing courses given in the third semester, change the semester to 4.
UPDATE u0012047.course
SET semester = 4
WHERE semester = 3 AND end_date IS NULL;
Sort rows with ORDER BY
The database server returns the result of a query in a certain order which you cannot predict. It depends on the type of server (postgreSQL does it differently from InnoDB e.g.), the query, internal optimisation, etc. You often want to sort lists according to one or more columns: alphabetically, from small to large, ... The following query sorts all courses according to increasing number of credits, i.e. the course with the smallest number of credits is at the top.
SELECT *
FROM sql_intro_en.course
ORDER BY credits ASC;
The default sorting is from small to large (‘ASCending’). You may in this case omit the word ‘ASC’. So this is an equivalent query:
SELECT *
FROM sql_intro_en.course
ORDER BY credits;
It can be even shorter. Instead of the name of the column you sort on, you
can just specify the order number of the column. That is a bit less readable but shorter. The credits are in the second column of all the columns shown in this SELECT so:
SELECT *
FROM sql_intro_en.course
ORDER BY 2;
You can also sort from large to small (‘DESCending sort’). This query shows a list of courses (just name, credits and coordinator) in reverse alphabetical order:
SELECT name, credits, coordinator
FROM sql_intro_en.course
ORDER BY name DESC;  -- alternative: ORDER BY 1 DESC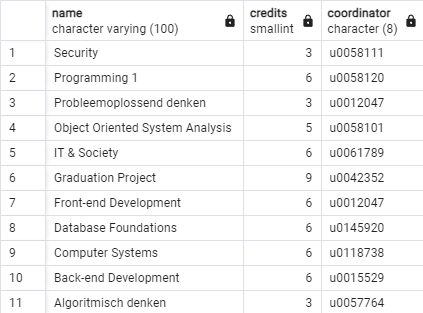
You can also sort on multiple columns by putting a comma between the
column names (or numbers) after ORDER BY. Write the query
that shows the full list (all columns) sorted by number of credits from
small to large and then (within a same number of ) by decreasing
semester.
SELECT *
FROM sql_intro_en.course
ORDER BY credits ASC, semester DESC;   -- alternative: ORDER BY 2, 7 DESC
Deleting entire table with DROP
In this introductory chapter you got a brief overview of a lot of different steps: create a schema, define a table, populate it with data, querying, updating, deleting rows, sorting, etc. Time to conclude with cleaning up what we created. Deleting a table can be done only if you are the owner of the table . Even if you give permissions to other people to manipulate your table, those people still can't delete it.
Needless to say, this is an operation you need to think carefully about. Gone is gone!

You delete a table with the DROP command.
DROP TABLE u0012047.course;The server responds with:
DROP TABLE
Query returned successfully in 128 msec.
Check (don't forget ‘Refresh’) that the table is no longer in your schema. Then you can also delete the schema itself with:
DROP SCHEMA u0012047;